


I've been seeing so many awesome textile diy's around lately: A Beautiful Mess' hand stamped dress, a bleach painting tutorial by Lune via A Beautiful Mess. I thought I'd give this screenprint diy, that I saw over at Manzanita, here's my take on this awesome and totally easy project. Here's what you need:
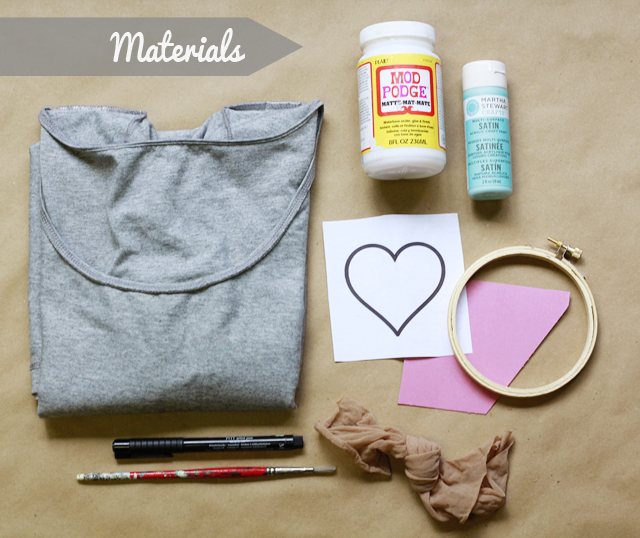
Shirt (thrifted), modge podge, fabric paint (this was my first time using Martha Stewart's all-purpose acrylic paint and it's amazing!), design, cardboard piece, embroidery hoop, nylon or panty-hose fabric, paintbrush, and permanent pen.
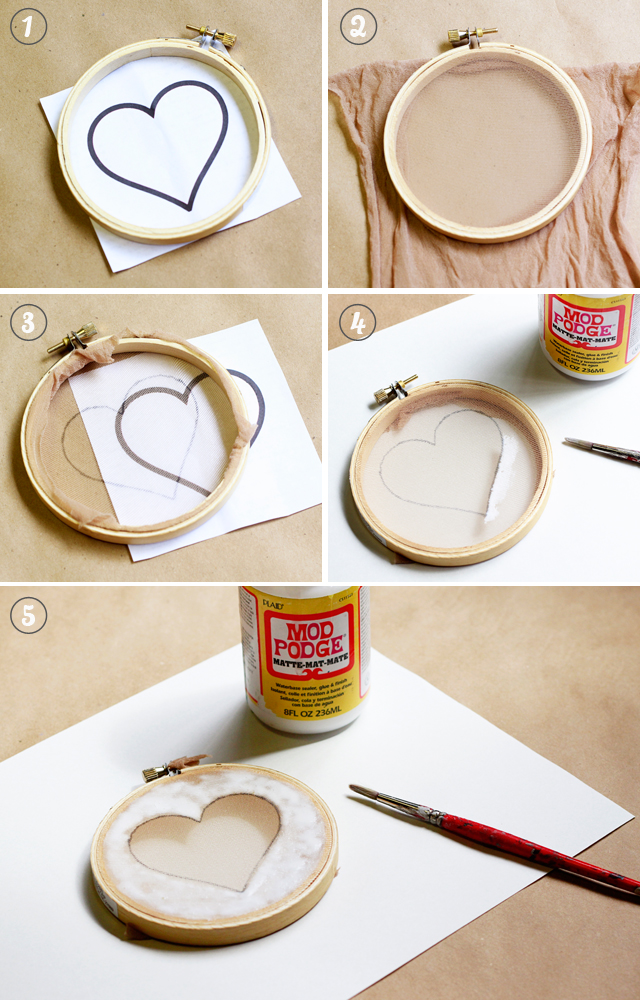
1. Create a design for your screenprint. I started with something simple since it was my first time using this method. Later, I did a more elaborate design for the front of the shirt, after I did this first heart as practice. Make sure that your that your embroidery hoop is large enough for your design.
2. Stretch the nylon over the hoop so that it is taut.
3. Trace your design using a a permanent pen.
4. Using Mod Podge, paint the "negative space", or, the space that you do not want to be painted.
5. Fill in the whole area, making sure there are no holes or gaps. I was obsessive about this because I didn't want the paint to seep through. Let dry completely. It took about 3 hours for this little one to dry.

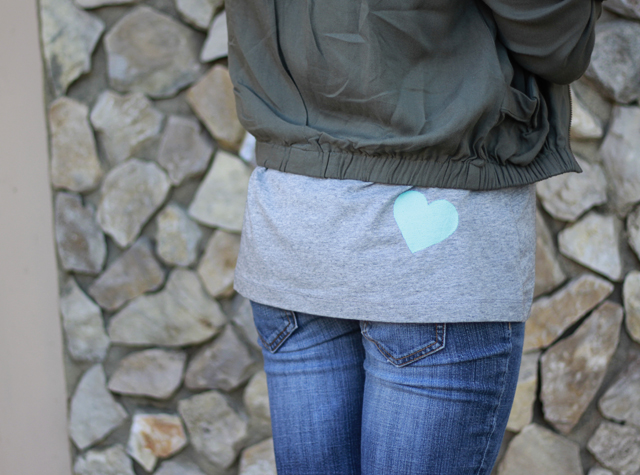
6. Lay the hoop flat on the shirt and position where you want the design to be, and place a piece of cardboard beneath the area so that the paint doesn't bleed through the back. Squirt a generous amount of paint over the design.
7. Use the cardboard to spread the paint over evenly.
8. Carefully lift the hoop off the shirt and voila!
9. Let the paint dry completely before wearing.
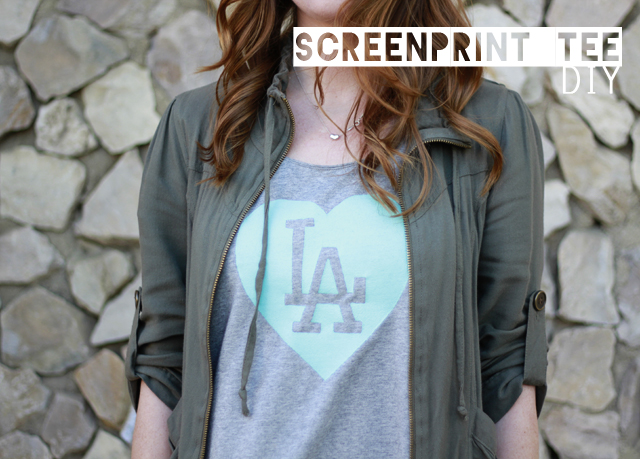
I also did the front part of the shirt. I made the LA symbol inside a heart. I thought it came out cute and I'm excited to wear it to the game! Go Dodgers!

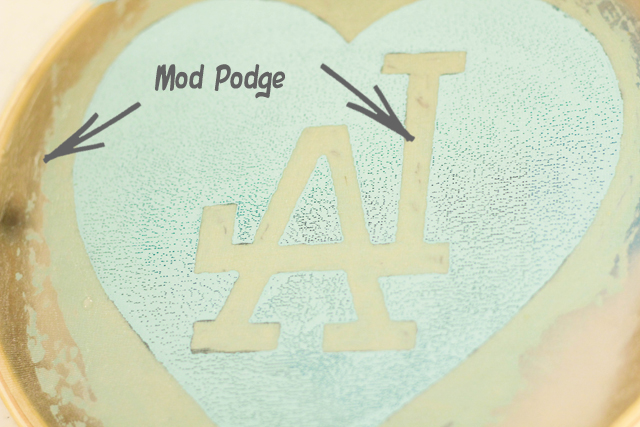
A few people have commented asking me how I made the design on the front. Here's a picture of the screen I made to create it. I painted Mod Podge on the outside of the heart, and the block letters, basically anywhere I didn't want the paint to go. So you kinda have to think in reverse. Hope this helps!


Hi Lauren,
ReplyDeleteI love this DIY session! It looks great and so inspiring!!
Thank you so much, love your blog too, just became a follower!
Jules d+o xo
Wow, I really love this! I might have to try this next! Thanks for sharing :)
ReplyDeleteI need to do this!!!! This is cute and looks so simple! I looooove Mod Podge! Can't live without the stuff!!!
ReplyDeletexoxo, your newest follower!
Natalie
mod podge is the same as gesso can i use for this??? thanks
DeleteNo! Gesso is acrylic primer and will ruin it.
DeleteI LOVE this idea!! I used to do screen printing in high school-- & this is a nice easy & inexpensive way to do it!! thanks :)
Deletekatie
What an adorable design. I'm trying to get the nerve up to try screen printing. This method seems super easy to do. Thanks for the tutorial.
ReplyDeleteI can't get over this! Need to try immediately!
ReplyDeleteGreat idea! How does it wash? I'd worry the paint would peel off the shirt since it's water based.
ReplyDeleteBe sure to buy FABRIC paint. If you can't find that, acrylic paint and fabric medium mixed together will do the trick (Mixing amounts should be on the bottle). As long as you heat set it after it's completely dry, the paint should hold up much like a decal or screen printed shirt from the store.
DeleteHope this helps.
Missy
you can do this with mod podge?! i may need to start screen printing everything i own...
ReplyDeleteI'm also curious like anonymous above me about how this holds up to washing?
Good question! I haven't actually washed it yet, haha. But when I do, I will probably hand wash it. The paint is supposed to be all-purpose, and I've seen it used on fabric before, so I'm hoping that it won't crack or peel off :) I will update my post after I wash it!
DeleteI've painted a hand full of tshirts and if you use proper paints it washes pretty good. I do iron my designs after the paint is dry tho, using some wax paper or simply a cloth over the design so the iron doesnt ruin the paint. Afterwards just wash on the mashine without problem (dont use high temperatures tho) and dont use the dryer, that would ruin the design and make the paint crack.
DeleteTy for the tut, i had never thought of using mod podge to create a permanent stencil, its a great idea :)
If you use fabric paint you should be OK, I stenciled a shirt for hubby almost two years ago, with only a thiiin layer of fabric paint and after two years of washing and drying normally it still looks pretty much like the day I did it. It's actually faded LESS than most of his regular tees. :)
Deleteyou can use any acrylic paint and mix it with fabric medium (found in paint sections at stores) and it should hold up. my high school art class used this technique
DeleteFantastic! And I love the color combo you chose.
ReplyDeletehow have i not read your blog before. i love it, i have wanted to do this for a while you make it look so easy xxxx
ReplyDeleteThis looks so good, and very easy too, I really want to try it!
ReplyDeleteI have been meaning to do this with a few thrifted napkins that I have. Thank you for the inspiration!
ReplyDeleteReally cute shirt.
Beautiful! Feminine sports wear can be tough to find and is usually crazy expensive. What a great idea!
ReplyDeleteI'd love to see how you did the more complicated pattern - withe the negative space inside the heart.
This is so great! I've been wanting to try screen printing for a while, but I just didn't want to invest in all the tools. This looks so easy and inexpensive. I'll be trying this very soon - maybe with my logo. Thanks for the tutorial!
ReplyDeletethis is great! Isn't it so easy? I really like the mini heart on the back. Thanks for shouting out to manzanita<3
ReplyDeleteLooove this. Thank you. This is another way of doing printing that i hadn't considered. So cool. Gotta try this
ReplyDeleteThat is beautifully executed! I must MUST must do this one day, when I don't have toddler paws climbing up my leg! ;)
ReplyDeleteWhy didn't I think of that?! You are a genius!
ReplyDeleteI may be slow or something but please can you explain how to put the letters inside? This looks so easy to do. I love it.
ReplyDeleteI added an another image image and a brief explaination to answer your question. Hope this helps!
Deleteyou totally ripped off this tutorial
ReplyDeleteShe gave credit : that means she didn't rip it off ... She added her personal touch to the original idea
DeleteLoved this! Thanks so much for posting. That blue is my faaaaaavorite!
ReplyDeleteAnd P.S. I don't see how you ripped off this tutorial if you linked blogs that gave you inspiration. Anonymous posters are such bullies!!!
Thanks Amanda! I tried my best to give credit to the other bloggers who were so creative to think of this great idea!!
ReplyDeleteOkay just one quick question, can you reuse the nylon on another shirt or do you have to redo the design on a new piece?
ReplyDeleteI'm not sure, but another reader commented saying that she used the screen to make more than one print :)
DeleteI believe when you use modge podge for the "negative" space, you CAN reuse the "stencil"...just make sure you wash out the paint you previously used. Just in case you want to use a different color. :)
DeleteThis comment has been removed by the author.
DeleteLove it! We're big Dodgers fans here so I'm going to have to do one like this but in Dodger blue! :) Thanks for the great tut!
ReplyDeleteThanks! GO Dodgers!
DeleteGreat way for my three wee ones to get those U of M shirts they've been wanting!
ReplyDeleteWonderful idea! I would love to know where you got the t shirt. It looks like the perfect fit!
ReplyDeleteThe shirt is thrifted :)
DeleteLove your DIY hun, kisses from Lima!
ReplyDeletewww.carlasbreakfastime.com
Thanks! Great blog, new follower!
Deletethis is great!
ReplyDeleteso stinkin' cool.
ReplyDeleteThis is really neat! Just another idea for your letters inside the heart. Cut out your design in freezer paper and then iron the freezer paper with glossy paper side onto the shirt with some fabric over the top of paper (between your iron and the paper) and something under the front of your shirt. The paper will stick to the fabric. Then screen print as normal. When everything is dry slowly lift the corners of the freezer paper and tada you have your image!
ReplyDeleteThank you for this! I soooo need to get me some freezer paper. There are so many uses. Great idea!
DeleteTo heat set acrylic paint on fabric: when paint is completely dry, cover design area with pressing cloth (I like using a flour sack dishtowel); heat DRY iron to cotton setting; using press & lift motion, press each area for 20seconds; repeat until entire design has been set. If pressing cloth starts to scorch, reduce iron heat a little. Never slide the iron, and don't worry about overlapping the last spot ironed--you want to make sure you dont miss any!
ReplyDeleteThank you so much! The directions on the bottle are so vague. I will definitely try this!
DeleteI found a cool way to make your screen printing designs look sort of vintage-y... When the paint is almost dry but still a bit tacky press the iron over it with no pressing cloth, just straight iron on the tacky paint. It will sizzle a bit, only do it for a second or two. Then lift up your iron and wipe clean and press somewhere else. It gives it a cool, worn in sort of look! I made my kiddos some vintage Mario mushroom shirts and they turned out super cool!
DeleteDoes the paint come off after you wash it? I'm thinking of doing this on onesies if the paint stays.
ReplyDeleteI haven't actually washed my shirt because I wore it once to the game. But from what I understand is that with the Martha Stewart All-Purpose paint is permanent. The directions on the bottle are not detailed , but I looked it up and you are suppose to iron it on low to set the design. Hope this helps!
DeleteYOU ROCK FOR THIS!!!!
ReplyDeleteThank you! i got the idea from a few other awesome bloggers!
DeleteI LOVE this!! Quick question, do you need to let the Mod Podge dry first before you apply the paint?
ReplyDeleteYes, let the Mod Podge dry for at least 2 hours :) then it will be waterproof.
DeleteLove this! I had never thought to screen print with a nylon! going to have to try. I have all of the other screen printing materials/fillers, etc. but never enough screens! a nylon might just answer my problems!
ReplyDeletexo dana
thewonderforest.com
Definitely. I took a screen painting class in my undergraduate, and the materials were so ridiculously overpriced! This is a great alternative if your not trying to achieve much detail. Thanks! By the way, I LOVE your blog...
Deletei have also heard of using tulle instead of hose
ReplyDeleteGreat idea! I had to actually go out and buy a pair of panty hose, because I never wear them, and they were like $7!
DeleteI picked up a pair of knee highs at walmart for 33c and after I had it on the ring I cut one side. But I will be trying tulle next... I have Tons that I use for tutus and hairbows for my daughters! Awesome idea! And thanks Lauren... My husband and kids love their shirts! :)
DeleteI want to know if I can use the nylon again, how to wash it to use it more than once?????
ReplyDeleteAna María
Once the mod podge is dry, it can't be washed or removed. But one reader did comment and say that she used the same screen to make more than one print.
DeleteGenius!! I love this and I must try it out - thanks for sharing!!
ReplyDeleteThank you! It was a fun project!
DeleteThis is genious! I will use this as soon as I can :)
ReplyDeleteThank you! Have fun!
DeleteI love the tee! looks awesome!
ReplyDeleteThank you!
DeleteThis is too cool!! I'm definitely going to try this out :)
ReplyDeleteLove this! Featured it on my blog this week so feel free to come over and grab a button! :)
ReplyDeletehttp://enjoyerofgrace.blogspot.com/p/grab-button.html
Thank you for sharing my post:) Your blog is great! new follower!
DeleteThis is wonderful! My students and I are going to forensics nationals in a month and a half, and they wanted to do t-shirts. Now we can do them without spending a fortune at an actual screenprinting shop!
ReplyDeletecould you do this by just cutting out what you want with cardboard instead of the nylon? or do you think that wouldn't really work?
ReplyDeleteI'm not sure. THe nylon allows you to spread the paint evenly and smoothly. THe cardboard may create a lip. But other readers have commented with other great ideas here, like using contact paper instead of Mod Podge. It just takes some experimenting :)
DeleteGreat tutorial! I'm so excited to try this!
ReplyDeleteThanks you!
DeleteI successfully reused my screen a couple times right in a row, while the paint was still wet. I tried rinsing it out and it's drying now... will let you know how it turns out!
ReplyDeleteNice job! Thank you for this, I will definitely try this, especially if I want to make a large amount of designs!
DeleteWashing it worked just fine- I was super careful though and really only worried about getting the paint out of the nylon and not off of the ModPodge. I wonder if Outdoor ModPodge would be better if you intend to wash and reuse it a lot?
DeleteAt any rate, reusing it later worked BEAUTIFULLY.
Where did you get your jacket from? i have been looking for one just like that for sooo long! oh and i love the design :)
ReplyDeleteill check back just in case you answered. thanks!
Her jacket looks just like one I found in the Kohls junior section...
DeleteI got it from this little hole in the wall store by my house. It was inexpensive and I've seen many like it!
DeleteI love your tutorial! Looks fairly easy too, I will for sure give it a try. :))
ReplyDeleteAs to washing - I have used all purpose acrylic paint to make my own tags, basically by stamping small pieces of white fabric with regular stamps and acrylic paint, then pressing the print with iron to "set" the paint, (I used parchment paper on top of the print, so the paint wouldn't stick to the iron, but I've read that it's not even necessary). I have washed the garment twice already, in hot water, using laundry detergent & fabric softner and drying it on the hottest setting, and the print still looks perfect as it did the day I made it. So I'm guessing that your project will survive the washing just as well. It might depend on the type of paint we use, but as far as I have played around, it works! :)
Thank you for this! I will definitely try this!
DeleteLooks so simple. Now to find Modge Podge in Hong Kong! The DIY challenge continues.
ReplyDeleteI have never used 'Mod Podge' but did make my own with elmers glue and water 50/50 in a jar and shake. It worked Great for some paper labels on glass jars. Haven't used it for this yet though! Good luck.
DeleteGreat idea! It's basically just glue anyways:)
Deletea nylon--eureka! what a great idea. i can definitely find those here (in shanghai). . and there has to be an embroidery hoop around. . .
ReplyDeletesimilar to Katherine, above, not sure if I'll find modpodge, but I may try using some acrylic medium and see if that does the trick. . . . love the extra paint-setting tips in the comments too. thanks!
Would this work with freezer paper?
ReplyDeleteI used freezer paper yesterday, and it worked wonderfully! I just used a foam brush and "dabbed" the paint into the space on the shirt, then I smoothed it over with the brush. You definitely want a piece of cardboard or something between the layers of the shirt because the fabric paint tends to bleed through a little bit.
DeleteThank you for sharing :) great suggestion!
DeleteDoes it matter if u use mod podge gloss instead of matte?
ReplyDeleteI'm not positive, but I would assume that glossy Mod Podge would work just fine! Hope that helps!
DeleteLove this, thanks so much for sharing!
ReplyDeleteSo cute! Thanks for showing the DIY!
ReplyDeletemybillie.blogspot.com
really gorgeous and simple! I love it!
ReplyDeleteWow, this is fantastic! I found your DIY via Kyla Roma and I'm so excited to check out the rest of your blog!
ReplyDeleteI just finished this project and it turned out great! As a very slight twist, I used a little less paint than you did and sort of scraped the excess off before I removed the screen. This created a more vintage feel to the design. Thank you for a perfect tutorial!
ReplyDeleteGreat idea! Thank you for sharing!
DeleteI have a silkscreen that I bought several years ago and use quite often. I cut my stencils with that out of contact paper (I think that's what it's called...) I can draw and cut out my design from it easily, and it sticks right to the screen. Then, after I'm done printing, it just peels off my screen and I can wash it an reuse it many, many times. This would probably work with this design as well. Just remember if you want lettering to cut it out backwards.
ReplyDeleteGreat Idea! I'll definitely have to try this! :) Thank you for sharing!
Deletethank you so much for the tutorial! i've seen a few on pinterest but didn't quite understand them. this is the easiest and most useful one i've read. thanks a bunch!
ReplyDeleteJust came across this project on Pinterest it is definately one I'm gonna have to try! Thanks for sharing!
ReplyDeleteThis is such a great Idea, I've been looking into buying some screen printing supplies but was shocked at the high prices!I recently bought an embroidery hoop for a buck at a thrift store that would be perfect :) I can't wait to try this out. Have a lovely day,
ReplyDeleteIzzy
http://jar-of-feathers.blogspot.com
I was wondering how you got LA done with the Mod Podge so nicely. Doesn't look at of lines or anything. Did you use a smaller paint brush?
ReplyDeleteYes, I used a small paint brush. And it helped that my design was simple.
DeleteBeen dying to try this technique.. thanks for making it look easy and totally approachable!
ReplyDelete~Amy
www.LadyMockingbird.com
Manzanita (the source you linked) actually got her instructions from this video, which may help some of the people who are here asking questions. And yes, you need to heat set fabric paint for it to last.
ReplyDeletehttp://www.youtube.com/watch?v=LkZh6p8OVfI&feature=relmfu
Thank you for this! :)
DeleteI actually work at a screen printer and this is really really cool. Just some tips about caring for your shirt...we usually suggest that you wash it inside out on cold and either hang to dry or use low heat in the dryer...but turning it inside out really helps to save the ink. Thanks for this tutorial...I've wanted to get shirts done, but it's super expensive just for 1-5. Also, like someone else said, you should be able to use the same nylon for another print while the paint is still wet.
ReplyDeleteThank you for all this information! I'm sure it will be very helpful! :)
DeleteSince I seem to be heavily involved in mod podging the world, guess I have to try this next. What a great idea.
ReplyDeleteBrilliant tutorial - thank you! I'm off to have a go myself :o) Bye xx
ReplyDeleteThis is so clever. I love that you use pantyhose & Mod Podge & the look you got is stunning.
ReplyDeleteGreat idea :)
ReplyDeleteDoes it have to be fabric paint? or will regular acrylic paint work as well?
ReplyDeleteShe used acrylic - all purpose paint
DeleteWill the paint clean off the pantyhose easily for multiple projects?
ReplyDeleteI did not try and wash it off myself, but other readers commented saying that they used their screen more than once. Hope that helps! :)
DeleteYes, you can wash the paint off and reuse the stencil. I just made 5 shirts today using the same stencil. Just make sure you rinse it right after you used it and let it dry completely before you use it again.
Deleteso i live in the city where bands tees are non-trackable, and if you want one, you make one
ReplyDeletei've been researching printing technics for a while, and this one, my fair lady, is the BEST one
i think we have a winner
Any update on if it holds after a wash?
ReplyDeleteHi Hi Lauren, First of all thanks for these nice DIY printing. Its looking very!!!!!!!!!!!! Nice and beautiful.My wife is fashion designer. When she design a shirt to follow your method. She win the best performance award.
ReplyDeleteTShirt manufacturers
Update on washing?
ReplyDeleteWhere have you been all my life??? :p
ReplyDeleteI've been thinking of silkscreen shirts but on leggings, so this method really helps me come up with a project.
Thanks!
Diwata
This is awesome! I will be making shirts for my husbands business now! Being a new business and all we needed low budget and this could be Low budget without looking it! And as for me, I think I see some leopard print coming on!
ReplyDeleteI don't have an embroidery hoop; are there any alternatives?
ReplyDeleteHey, I tried this method and it worked great, except that the paint was really bubbly when I lifted the hoop. Your close up picture of the small heart looks a little bubbly too, does it fix itself during the drying, or did you do something different? Any suggestions? Thanks for the tutorial by the way!
ReplyDeleteAmazing idea! I dont think ive ever done a DIY project, but im going to try this.
ReplyDeleteCan you suggest a place on line to for stencils and cute lettering like what you used? If i tried to freehand even a heart it would look like a blob!
Literally just google "stencils." Not that hard.
DeleteWow I really love this, I found it on Pinterest, this is super great!
ReplyDeleteThanks for sharing!
-Your newest follower :)
Thank you ! i was wondering how to make this work.. the modge podge on the hose is great ! & cheap ! TYVM
ReplyDeleteBrilliant work, the prints look great!
ReplyDeleteI made an old english D version of this shirt and wore it to a game this week. It looks really cute and definitely doesn't give a "I made this myself" vibe that my DIY projects tend to normally give. Thanks for the inspiration.
ReplyDeleteHi Lauren! Got inspired by your blog! Just recently been into screen printing and getting the hang of it. Thanks for sharing this. Here's to hoping I might post something soon too!
ReplyDeleteGreat tutorial - thanks and your tee turned out so cute! I have this linked to my screen printing DIY post as well today, for inspiration!
ReplyDeleteHow did you get the design so crisp? Love this tutorial, it was super easy, my only complaint is that it looks like the paint bled a little. Any advice???? oh, I used, sheer fabric and fabric paint.
ReplyDeletefound this on pinterest just now....awesome diy..the t-shirt looks so pretty n cute...thanks for sharing!
ReplyDeleteI just did the little heart on the back of shirt.. letting it dry overnight and then going to do the front.. can't believe how cute and easy it is.. Thanks for posting this..
ReplyDeleteYou are simple awesome. I couldn't have thought of doing it this way.
ReplyDeleteThis is so cool and simple. Thank you! If using multiple colors do you let the first color dry first?
ReplyDeleteThank you so very much for this! I am a Girl Scout leader and our troop is making GS pull-string backbacks in a few days. I have been looking all over the internet looking for exactly this! Now I'm off to the craft store to get the supplies for this. I have 12 backpacks to prep with 5 inch GS letters so the girls can customize them with their own fabric paint pictures. This was incredibly helpful. Thank you again. I really appreciate the time you took to put this on the internet for everyone!
ReplyDeleteI made the screen today. No joke, you have to wait a long time for it to dry completely. It took 2 hours for mine to dry. After an hour, I put it infront of a fan. My prints are done.
ReplyDeleteI have been researching various fabric painting methods the last few weeks. I tried my hand the first time the other night with stenciling on a shirt. I started very easy with a soccer ball. Turned out great. I am now ready to add to that shirt with a 2nd color & glitter & will also add rhinestones once all is dry.
ReplyDeleteI have been fascinated by the screen printing technique, though, but the supplies to do it are outrageously priced! So, this tutorial is FANTASTIC!!! I think I could handle modge podgeing a screen much quicker & more precise than an exacto knife to cardstock or freezer paper for a stencil. ~Kim
Thanks for the post! I just used your tutorial to make shirts for the walk to end alzheimer's that I'm doing next weekend. We'll see how they turn out :)
ReplyDeleteAwesome idea!! Love this! Thanks for sharing! :-)
ReplyDeleteI really like these long sleeve cotton shirts from Soffe, they are versatile and easily worn in many situations. Sometimes I wear these as layering with an outer short sleeve shirt, or I can wear these with some sweats when I'm at home just relaxing or even for light workouts.
ReplyDeleteOne note I would like to make..if you like your shirts worn with a little breathing room, I recommend you buy one size up. I normally wear Large, but my instincts told me to go with X-large. When the shirts arrived, the X-large felt roomy and cormfortble(which meant a large would've been slightly snug).
The navy color I got looks good. The material is neither too thick nor too thin, just right for these type of shirts. It's also 100% cotton, which is what I prefer. Lastly, these shirts are priced reasonbly(under eight bucks each).
Ironing AFTER it dries would probably help seal in the design. In my college screen printing class the teacher told us never to use fabric softener when washing screen printed clothes as it causes the design to crack, so keep that in mind as well! Very cool tutorial.
ReplyDeletegreat tutorial, thanks for sharing :) pics of my first try here
ReplyDeletehttp://abimakes.blogspot.co.uk/2012/11/pva-glue-screen-printing.html
I love the way you explain it. its really amazing post. I initially found your blog a week or so ago, and I want to subscribe to your RSS feed.
ReplyDeleteOMG that's freaking easy genius! Thanks for this! I'll have to favorite to come back to it when I do my kids shirts!
ReplyDeleteThe next thing to think about is just how much pressure you would like the gay sizegenetics therapist to use on you. Different practitioners have different styles when they perform an erotic gay sizegenetics. You must communicate with your therapist so make will know exactly what you would like in an erotic gay sizegenetics. You may ask your gay sizegenetics therapist what their style it really is and whether or not they are adapt it in your needs and desires. At any time you contain a pressure level you find very enjoyable, make sure you mention this whenever you book the appointment with your sizegenetics.
ReplyDeletehttp://buysizegeneticsonline.tumblr.com/
Hi Lauren. Thanks for your tutorial. I followed it to make a Christmas t-shirt http://thoughtsfromplac.es/post/37724055307/ho-ho-ho-t-shirt
ReplyDelete
ReplyDeleteT-Shirt OS – wearable, shareable, programmable clothing.
design a t shirt
print on shirts
digital t shirt printing
custom tee shirts
create t shirts
Great idea! It would be perfect for a tote bag as well!
ReplyDeleteI love this idea!! So clever and perfect for Valentine's Day DIY project! I have included this idea into my top 5 valentine's Day DIY ideas. Hope you like it! http://meivintage.blogspot.com/2013/02/diy-ideas-for-valentines-day.html
ReplyDeleteHello I want to know if instead of use in this Mod Dodge can I use Gesso? IS THE SAME?? thanks!
ReplyDeleteI want to know if i can use gesso instead of Mod thanks!! I want to do this is very easy and cute! :)
ReplyDeletewe really enjoyed your article, thanks for sharing and more power!
ReplyDeleteHi I just did it!!! so simple! very time consuming, but cheap and fun! can't wait to wear it! thanks for the fabulously simple tutorial!
ReplyDeletelove,
ariella
www.glitterartfit.blogspot.com
I'm definitely doing this tomorrow! Screen printing sparked my interest when I was working at Michael's but the equipment was too expensive. This is fabulous!
ReplyDeleteThat's quite a nice idea! I think it could be fun to invite some friends an do this in a group. Everyone can think of a different design but you can get inspired by your friends as well. Thanks for charing!
ReplyDeleteHi Lauren,
ReplyDeleteThank you for showing us how to make screen printing at home!
The result is amazing!
I will try it myself soon!
http://tailorspy.blogspot.gr/
I participate in a lot of charity walks and want to make team t-shirts, this is going to save me a lot of time and money this year!!!! Thank you for posting!!!!
ReplyDeleteIt is nice and excellent collection of variety of t-shirts.It is a good design of t-shirts and to wear.Kids will like very much this kinds of t-shirts.design a tshirt
ReplyDeleteDoes anyone know if you could use a vinyl stencil on the nylon instead of the modpodge? That would make it sooo much easier
ReplyDeleteıts beatiifull
ReplyDeleteDiscover online the sporty and fashionably designed Gaastra t-shirts for
ReplyDeletemen in various colours made from top-quality and hard-wearing cotton.
Stylist T-Shirt Shop
I dont have mod podge.. wat else can I use in its place??
ReplyDeleteDigital T-Shirt Printing is a site, where you can designe your T-Shirt.
ReplyDeleteYou can also find the sporty and fashionable designed gaastra T-Shirts for men and also available for women. Good News for you that we are open for business!
Both online and local.. So, You can easily choose and also buy our product very easily.
Happy Shopping....!!!
Love this idea!!! Totally interesting!!! Printing your own shirt designs.
ReplyDeleteTrying today!! If it goes well, you have saved Big Brothers Big Sisters some money which is wonderful since we are non profit <3 :)
ReplyDeleteThis is cool. so great. I want to do it also. Thanks
ReplyDeleteonline deals
I'm definitely going to try this with my kids. Thanks for the tutorial.
ReplyDeleteBrilliant! Thanks for this. Can't wait to give it a shot. I am really curious to see if the screen will hold up to multiple uses.
ReplyDeleteAwesome idea I like Your T-shirt now :D
ReplyDeleteThis is a great tutorial!! I'm working on a shirt at this very moment, how long do you think I need to wait for the paint to dry before adding a second layer? (I'm working with different colours one on top of the other)
ReplyDeletethanks a lot!!
Kurva jóóóóóóóóóóóóóóóóóó :)
ReplyDeletei cant find any mod podge in my place... is there any substitute to it?
ReplyDeleteYou made a really nice screen printing t shirts. I really like your blog and t shirts.
ReplyDeleteHow does the paint hold up when washed?
ReplyDeletecan i use a substitute for mod podge. i live in india and we dont have this product
ReplyDeleteI just saw this tutorial when it was tweeted by Amy Anderson of modpodgerocks.tumblr.com and I'm so excited to try it myself... I even have everything I need on hand ~ woo-hoo!
ReplyDeleteThank you, Lauren!
I think Cheaptees.org is one of the best and basically tees printing company. Cheaptees.org uses only the softest most comfortable fabrics with all our apparel manufactured and presents quality services.
ReplyDeleteFor a disposable "one of a kind" design stencil I'd use just simple white Elmer's glue - because the point, I believe, is to cover the net so it does not let paint through, but Elmer's is not waterproof and stencil won't be washed. However, ModPodge seem to be washable after stencil has been used, and is great for multiple prints.
ReplyDeleteI've never done this kind of thing before but the ideas are endless. Thank you. I'll be storing this idea for the future.
ReplyDeleteWOW! I love your simple and easy steps on how to screenprint your tee to what you want it to look like and say. I can't say it enough ... super easy super easy super easy! Did I mention fabulous! Can't wait to try it on my shirts!
ReplyDeleteI would love to do this with my preschool art class! Do you think the stencil will work if it's damp? I will have to rinse out the color from the previous student and quickly use it again.
ReplyDeleteNobody can reject the info you have given in the blogs, this is actually a great work.
ReplyDeletecheap t-shirtz
Can you reuse the same screen from shirt to shirt if making multiple if the same? Looking to use this for a family reunion!
ReplyDeleteWow, awesome blog, thanks for the article.
ReplyDeletefunny t shirts
I really like how easy you made that look. I wish that I could print my own t shirts whenever I felt like it. I probably wouldn't get a heart on it, but I would put a cool sword coming out of flames or something. You know, something manly. http://www.mountainscreenimpressions.com/screen-printing.html
ReplyDeleteHi, nice post. This is an interesting and very informative blog. Thanks for sharing your ideas. Good blogs style too.All over T shirt Printing
ReplyDeleteI am in the need of some printed t shirts. I have a few designs I want to try out and to see what they look like. I have never done this before so I would have to get some help on it for sure. http://www.medertees.com/
ReplyDeleteI love the look of screen printed t shirts! Great article, I remember I used to do screen printing back in high school as well. I was always making t shirts for kids in my classes. I don't have the material to still do it anymore unfortunately.
ReplyDeletehttp://www.medertees.com/
I always like your blog post because you always comes with different ideas and information. I always shared your site post with my friends. Keep posting and i will follow you.
ReplyDeletecustom apparel
Would you mind if I referenced this on my site? Doing a blog post about a similar topic and I think it would link well.
ReplyDeleteAmela
T-shirt printing Milton keynes
This comment has been removed by the author.
ReplyDeleteGreat Design! forest and lakes offers free blank t-shirts for fashion designer to DIY or Screen Printing! If intested, please contact with nina@forestandlakes.com
ReplyDeleteI love this DIY! It's a very creative use of the embroidery hoop. Do you have any embroidery DIY projects? I know it's a bit more difficult but I've always wanted to try. I do like a challenge! Thanks for sharing your ideas and tricks with us, this was very helpful! http://www.mountainscreenimpressions.com
ReplyDelete