


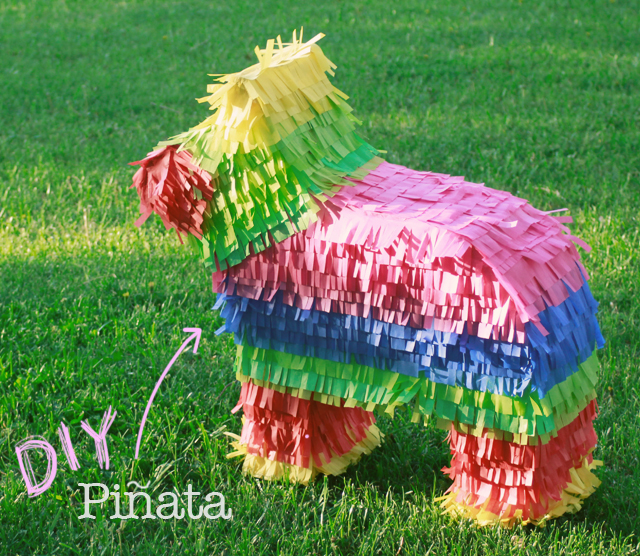
Chris is graduating from his film program next week, and we are celebrating by having a graduation/Cinco De Mayo party on the 5th. I've been wanting to make my own piñata for a while now, especially since I saw this. So... I thought what better opportunity to make a Piñata?
Here's what you need:

Cardboard (I used a big box from a TV)
Duct tape & masking tape
white glue
wire
rope
scissors
box cutter
plyers with wire cutter
tissue paper in assorted colors
fun sized candy
permanent marker & pencil
screw driver

1. Start by tracing a shape of a burro, when your happy with your design, outline it with permanent marker.
2. Cut out the first burro and then use it to trace a second.
3. Determine how wide you want your piñata to be, and cut out strips long strips. I made mine about 8 inches wide. Try to cut against the grain, I bent the paper so that it curled and was more flexible to bend.
4. Using the cardboard strips, gradually build up the walls with small pieces of duct tape. I started out just using masking tape but It was not strong enough.
5. Connect all the pieces, making sure it is secure and sealed.
6. Apply plenty of masking tape, while removing the duct tape one piece at a time. I did this because the white glue won't adhere to the duct tape as well as the masking tape which is basically paper.

7. Create a "trap door" to fill with candy. I almost forgot to do this.
8. Then, I thought I would reinforce the point where the piñata would be suspended. To prevent the hanger from just ripping through, and the piñata flying off, I glued and duct taped an extra strip of cardboard and punched 2 holes.
*At this point, I would recommend attaching your hander while the piñata is open (step 19) I didn't think to do this but in hindsight I would have, because it sure is a pain to do it once it is closed.
9. Attach the other piece securely with tape. Use your judgement with how well you seal the pieces. If this piñata were intended for children I would probably be less thorough. However, I thought of how a bunch of drunk guys will be taking a shot at this poor little guy, I made sure to make him nice and strong.
10. I drew a striped pattern and marked what color to use in each.

11. Fold several pieces of tissue paper and cut a 3 inch section.
12. Cut some fringe.
13. Glue the strips of paper starting with the legs. It's important to start at the bottom and work up.
14. Switch to another color and layer it over the previous.
15. Layer the paper, either tightly or more spaced out, it will jet effect how long the process will take. It took me about 1 1/2 hours to cover mine.
16. I continued the horizontal stripes up until the neck.

17. I changed the direction of the stripes at the head to make it look more like a donkey.
18. I added red and yellow for the ears and snout.
19. Enter through the trap door, and thread the wire through the two holes. (again, this would have been WAY easier if I had done it earlier)
20. Double knot your rope to the loop and hang from a tree. (I'm no boy scout, so if you have nay better knots to tie a piñata with let me know!)

Tips:
* I didn't show how to fill the piñata with candy, because our party isn't until the 5th, soooo I'm spending this time collecting more "adult" treats in inside. e.g: mini bottles of tequila, lottery tickets, matches, etc. BUT I plan to fill it with contents, an then apply heck of a lot of masking tap to the trap door. Maybe some white glue.
* Definitely go with name brand masking tape like Scotch or 3M. I bought some cheap stuff from the 99 cent store where I bought the candy and tissue paper, and I'll tell you, it made my job a lot harder. I eventually just went out and got a roll of scotch masking tape. MUCH better.
*Don't forget to make a trap door. I almost closed it up without it.


I am so stinkin' impressed by your pinata! I've never thought to make one! Now I actually want to!
ReplyDelete:O That's such a well done pinata, I love this!
ReplyDeleteI kind of wanna do a cinco de mayo party just for an excuse to make this ;)
xo
http://kittysnooks.blogspot.ca/
I love this! Much simpler than the other versions :)
ReplyDeletexx
www.queenoffunkydiy.blogspot.com
careful with the mini booze, we did that for my roommate 21st and while they were hitting the pinata the plastic bottles got too shaken up and started leaking all over the candy. it didnt end up working out the way we planned. maybe put the booze in protective bubble wrap of or something so it doesnt break.
ReplyDeleteMy birthday is in July and this is SOOO gonna be at my birthday party! I'm gonna make my husband make it for me!
ReplyDeleteNew fan! I'm glad I found you through Jar of Feathers!!
Courtney @ http://violethillboutique.blogspot.com
Love it! Share your link at http://creativityunmasked.blogspot.com.au/2012/04/six-for-saturday-or-sunday_28.html
ReplyDeleteI'm from Mexico, and I suggest you to make the trap door on the top side of the piñata, so you can fill it with more candies and prevent it to let the filling fly all over the place while shaking. I've seen that the piñata makers use a kind of papier maché to make it, generally beginning with a baloon covered with it and then giving it another shape with cardboard pieces, and put a piece of thin jute rope or something like that since the beginnig, so they can hang the piñata when it's drying and during the fiesta.
ReplyDeleteHope it helps you for future piñata making :)
This is such an impressive DIY project, I love how detailed you made each step.
ReplyDelete