


I love just about anything with fringe or tassels, it's just such a fun texture, and it shakes when you move! I've been seeing different versions of this idea online, so I decided to give it a try myself. Here's how I made my fringe necklace.

Here's what you'll need: Fringe, you can buy it by the yard in different colors and lengths. I chose to use pink, black and cream. Pliers, necklace chain, rings (3), clasp, velvet ribbon, matching embroidery thread and needle, Tacky glue (not shown)
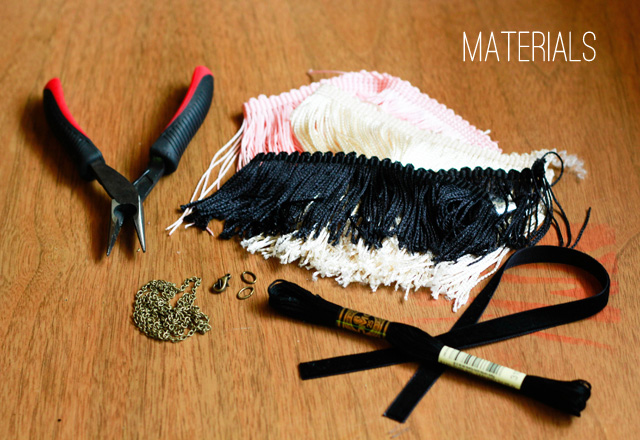
All this only cost me 14 bucks! And you may already have some of these supplies if you dig around.

You want to have three strips of fringe that are three different lengths. But, since my pink and white fringe were both the same length (8 cm), I trimmed the white fringe, so that I could create three tiers. I taped both ends down and used a rotary cutter to trim the ends straight.

At first I tried pinning the three strips of fringe together, but this material is just so tricky to deal with, and it unravels VERY easily. So I just ended up tacky gluing them together, I think it worked pretty well.
Use small beads of glue to attach the three strips at the top seam. Tacky glue can be tough to get a needle through, once it's dried, so don't use too much.

After the glue has dried, use a running stitch to sew the fringe together, I did two passes just to be secure.

Hopefully your stitches come out tidier than mine. Oh well, it's on the back so no one will see it.

Sew a two inch strip of the velvet ribbon to cover and finish off the two ends of the fringe. Then sew two rings to the velvet ribbon.

Measure how long you want your necklace to be. Then attach a claps to each end of the chain.

Attach the other two ends of the chain to the rings, and your done!
 I wore mine out Saturday night to Chris' show, with a black dress, and a vintage silk vest.
And I got to wear my new shoes that my mommy gave me! Remember them from my wishlist?


Hope you had a lovely weekend!


SO cute. I love it.
ReplyDeleteKy
www.thebirdssay.blogspot.com
Oh I love this project!!!!! :) Super adorable!
ReplyDeleteSO cute!! perhaps ill try that this week!
ReplyDeleteIt's beautiful!!! Great job!
ReplyDeletehttp://shannonhearts.blogspot.com
The necklace is beautiful! It sounds super easy too! Thanks!
ReplyDeleteThanks for this tutorial! I'm so excited to try this as my next summer project! xo
ReplyDeleteFlirty and fun! I'm just imagining all the color combinations that could be done with this. :)
ReplyDeleteI absolutely love this!! I'm just confused as to wear you put the ribbon. Just on the ends? Where the rings are? haha sorry, It should be so simple, I just want to make sure, ps love your blog! :)
ReplyDeletegenius!
ReplyDeletehttp://babybakerlove.blogspot.com/
this is pretty awesome lady! You look great in it:)
ReplyDeleteVery cute! And looks pretty easy too! Ill have to give it a try. Thanks for sharing!
ReplyDeleteHi, these shoes are swedish hasbeens as well? because I cant find these. thanks :)
ReplyDelete